Ladybug Chocolate Covered Oreos
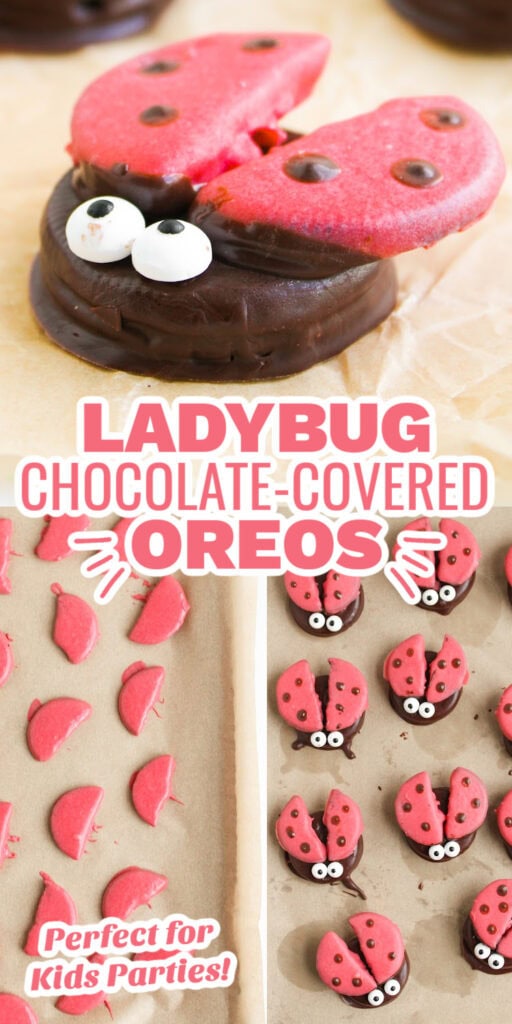
These Ladybug Chocolate Covered Oreos are a cute, easy treat for both kids and adults. It’s a no-bake dessert recipe you can make with your kids—ideal for birthday parties, classroom treats, or a fun spring-themed celebration.

WANT TO SAVE THIS FOR LATER?
We made this recipe for a kids’ tea party, and it was a hit! These cookies are such fun finger food—they’re cute, easy to grab, and pair perfectly with mini sandwiches, fruit kabobs, or tiny cupcakes, all served alongside your kids’ favorite tea.
You might also love my Ladybug Appetizer Recipe—or check out my list of 20 Easy Kids’ Party Finger Foods for Snacks and Appetizers for even more fun ideas!
How to Make Ladybug Chocolate Covered Oreos
Ingredients you’ll need for this recipe

Step by Step Guide
1. Line two baking sheets with parchment paper.

2. In a microwave-safe bowl, melt your milk chocolate melts with the vegetable oil. Go slow—30 seconds at a time, stirring in between—until it’s nice and smooth.

3. Dip 12 Oreo cookies into the melted milk chocolate, coat them completely, then gently tap off the excess.


4. Place them on one of your prepared baking sheets and pop them in the fridge to set for about 10 minutes.

5. Carefully separate the remaining Oreo cookies and cut each side in half—these will become your ladybug wings! It helps to go slow and use a gentle sawing motion with a sharp knife.

6. Melt the white chocolate the same way as before. Once it’s smooth, add red food coloring a little at a time until you get a nice bright red.


7. Dip your Oreo halves into the red chocolate, covering both sides, and place them on the second baking sheet. Freeze for 10–15 minutes until they’re set.

8. Once the red wings are hardened, dip the flat side in milk chocolate and attach them to the tops of your milk chocolate-covered cookies.

9. Dip your edible eyes in a tiny bit of melted chocolate and stick them on near the top.

10. Use a cake pop stick (or the end of a spoon or skewer) to dot on the signature ladybug spots using the remaining milk chocolate.


11. Pop the finished cookies back in the fridge for another 10 minutes to fully set.

Serve and Enjoy!

Important Recipe Notes
- Have a few extra cookies on hand in case some break while cutting or separating. It happens—especially with little helpers in the kitchen!
- When splitting Oreos for the wings, twist gently and use a sharp knife to cut clean halves. A warm knife (run under hot water and dried) can help reduce breakage.
- Add Food Coloring Slowly: Start with a small amount of red food coloring and build up gradually. Gel food coloring works best for a bold, vibrant color without thinning the chocolate too much.
- Chill Between Steps: Don’t skip the chilling steps! It helps the chocolate set quickly and keeps everything from sliding around when assembling.
- Work Quickly with Melted Chocolate: Once the chocolate is melted, work efficiently before it starts to harden. If needed, reheat in the microwave for a few seconds to keep it smooth.
- Customize for Holidays or Themes: You can easily swap out the colors and decorations to match different party themes—think green wings for St. Patrick’s Day or pastel colors for Easter!
Ladybug Chocolate Covered Oreos

Ingredients
- 18 to 20 Oreo cookies
- 10 oz milk chocolate melts
- 10 oz white chocolate melts
- 1 tbsp vegetable oil
- Red food coloring
- Edible eyes
Instructions
- Line two baking sheets with parchment paper.
- In a microwave-safe bowl, melt your milk chocolate melts with the vegetable oil. Go slow—30 seconds at a time, stirring in between—until it’s nice and smooth.
- Dip 12 Oreo cookies into the melted milk chocolate, coat them completely, then gently tap off the excess.
- Place them on one of your prepared baking sheets and pop them in the fridge to set for about 10 minutes.
- Carefully separate the remaining Oreo cookies and cut each side in half—these will become your ladybug wings! It helps to go slow and use a gentle sawing motion with a sharp knife.
- Melt the white chocolate the same way as before. Once it’s smooth, add red food coloring a little at a time until you get a nice bright red.
- Dip your Oreo halves into the red chocolate, covering both sides, and place them on the second baking sheet. Freeze for 10–15 minutes until they’re set.
- Once the red wings are hardened, dip the flat side in milk chocolate and attach them to the tops of your milk chocolate-covered cookies.
- Dip your edible eyes in a tiny bit of melted chocolate and stick them on near the top.
- Use a cake pop stick (or the end of a spoon or skewer) to dot on the signature ladybug spots using the remaining milk chocolate.
- Pop the finished cookies back in the fridge for another 10 minutes to fully set.