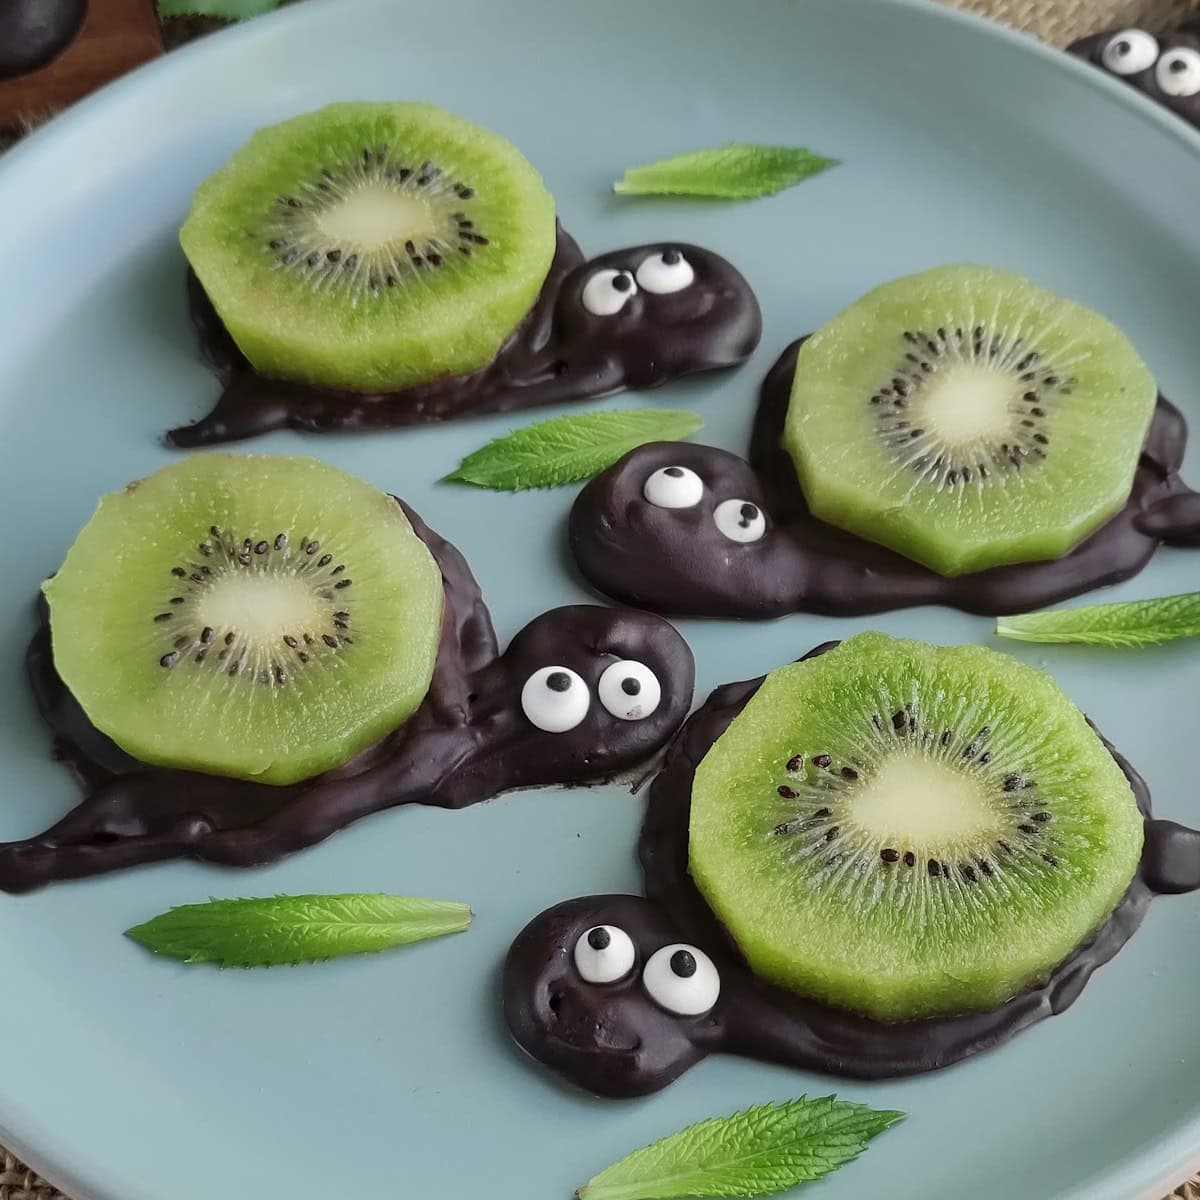
Kiwi Turtles
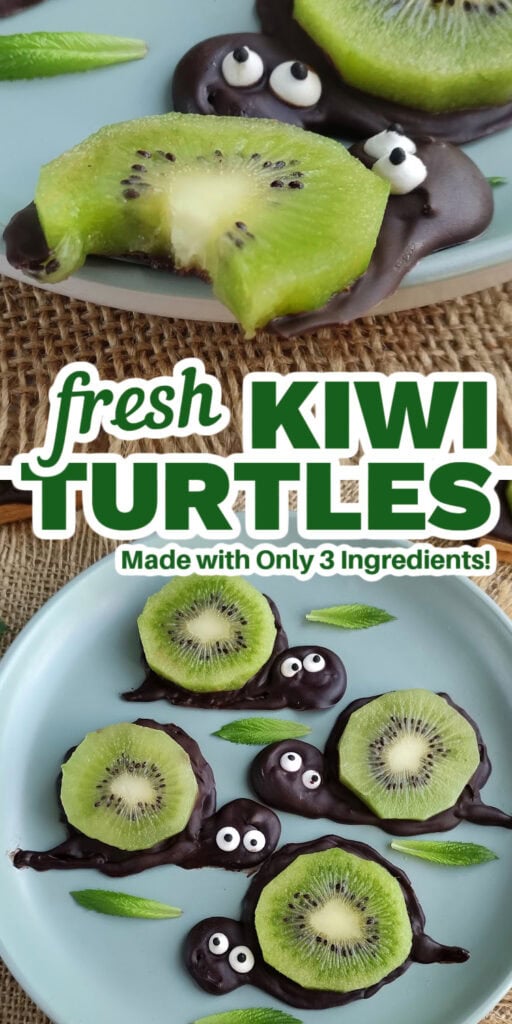
My kids always get a kick out of these Kiwi Turtles. They’re a healthy snack made with fresh kiwi, dark chocolate, and candy eyes, but it’s the adorable turtle shape that makes them so much fun. They’re simple enough for kids to help make and are a great way to add a little fruit to parties, playdates, or after-school snacks!

WANT TO SAVE THIS FOR LATER?
This is such an easy fruit snack recipe and turns a fresh kiwi into a playful treat! I take a platter of these to every playdate and they’re always a huge hit!
Serve this with my Strawberry Forest Hedgehogs and Caterpillar Fruit Kabobs.
How to Make Kiwi Turtles?
Ingredients you’ll need for this recipe

Step-by-Step Guide
1. Rinse the kiwi in water and blot with a towel. Cut off the edges and slice the kiwi into circles. You should get 6 equal circles. Lay the kiwi out on the towel, cover with the free end to remove excess moisture.
2. Outline the outlines of the snails on baking paper on a sheet pan. The large circle should be slightly smaller in size than the diameter of the kiwi, about 3 inches.
3. Next to it, place a 1-inch diameter circle. You can use a shot glass or small measuring cup to trace these out. Turn the paper over with the drawn side down and place it on a board or tray.

3. Melt the chocolate. This can be done in a water bath. Fill a saucepan half or a third full with water, and heat it on the stove to medium-high heat. It is important not to let the water boil, as this can cause the chocolate to melt improperly.
4. Next, place a smaller bowl over the pot of water and add the chocolate pieces. Stir constantly until everything is in a liquid state.

4. You will need a steady hand and a pastry syringe to draw the snail’s outline, head, and tail with chocolate. While the chocolate is still soft, glue on the eyes and kiwi circles.

5. Place the dessert in the refrigerator for 15-20 minutes or until the chocolate hardens. Transfer the chocolate-covered kiwi to a chilled serving plate along with the mint leaves.
Serve and Enjoy!

Important Recipe Notes
- Make sure to blot the kiwi slices dry to prevent excess moisture from making the chocolate slide.
- When melting chocolate, use a low heat if melting on the stove, or microwave in short bursts to avoid burning the chocolate.
- A pastry syringe or small piping bag works best for outlining the turtles — take your time for the neatest results!
- Let the chocolate harden in the fridge for at least 15–20 minutes before serving to keep the turtles intact.
- Add fresh mint leaves for a pop of color and a little freshness.
- You can prep these a few hours in advance and keep them chilled until ready to serve.
- If you don’t have sugar eyes, small chocolate chips or icing dots work great as a substitute!
Kiwi Turtles

Ingredients
- 2 kiwis
- 3 ounces’ dark chocolate
- 12 sugar eyes
- some mint for garnish
Instructions
- Rinse kiwi in water and blot in a towel. Cut off the edges and slice the kiwi into circles. You should get 6 equal circles. Lay the kiwi out on the towel, cover with the free end to remove excess moisture.
- Outline the outlines of the snails on baking paper. The large circle should be slightly smaller in size than the diameter of the kiwi, about 3 inches.
- Next to it, place a 1-inch diameter circle. You don't have to have a circlet in the house, use shot glasses or cookies. Turn the paper over with the drawn side down and place it on a board or tray.
- Melt the chocolate. This can be done in a water bath. Fill a saucepan half or a third full with water, and heat it on the stove to medium-high heat. It is important not to let the water boil, as this can cause the chocolate to melt improperly.
- Next, place a smaller bowl over the pot of water and add the chocolate pieces. Stir constantly until everything is in a liquid state.
- You will need a steady hand and a pastry syringe to draw the snail's outline, head and tail with chocolate. While the chocolate is still soft, glue on the eyes and kiwi circles.
- Place the dessert in the refrigerator for 15-20 minutes or until the chocolate hardens. Transfer the chocolate covered kiwi to a chilled serving plate along with the mint leaves.