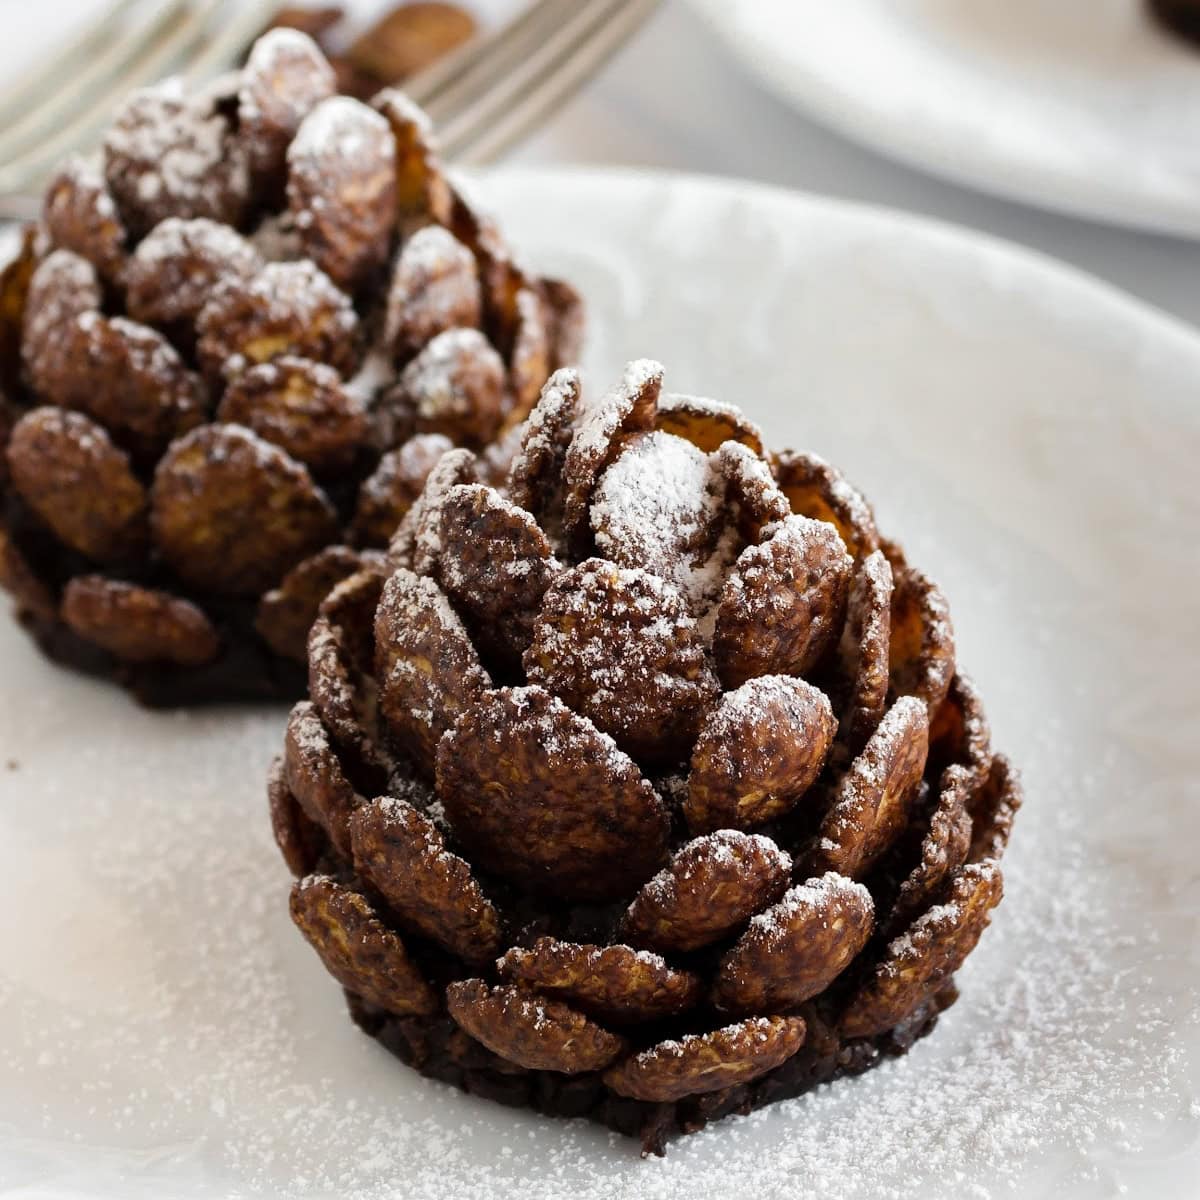
Christmas Edible Chocolate Pine Cones


These Christmas Edible Chocolate Pine Cones are a no-bake dessert recipe made with a rich, creamy dough and topped with chocolate cereal to give them that classic pine cone look. It’s an adorable Christmas treat you can add to your holiday baking list.

WANT TO SAVE THIS FOR LATER?
I love this Christmas treat recipe because it uses simple ingredients and makes an eye-catching dessert that’s perfect for parties and gift-giving. You can make these in advance and store them until your holiday gathering, which saves you time.
Try also my Gingerbread House Macarons and Christmas Wreath Sugar Cookies for more cute Christmas treat ideas.
How to Make Christmas Edible Chocolate Pine Cones
Ingredients you’ll need for this recipe

Step-by-Step Guide
1. Begin by lining a baking tray with a Silpat mat. This handy mat will keep your pine cones from sticking and make cleanup a breeze. Set it aside for now.
2. Grab your food processor and let’s get crushing! Blitz those biscuits until they’re nice and crumbly.
3. In a medium bowl, combine the crushed biscuits with shredded coconut, cream cheese, cocoa powder, and powdered sugar (if you’re using it).

4. Stir until everything is blended together into a smooth, thick dough.

5. Divide your dough into 8 equal parts. Shape each piece into a cone, with the pointy end at the top. Place each cone on your prepared baking tray.

6. Starting at the bottom of each cone, press chocolate cereal pieces into the dough, working your way up in a spiral pattern. Angle each piece slightly upwards to mimic the look of pine cone scales.

7. Dust your chocolate pine cones with a light sprinkle of powdered sugar.

8. Let the pine cones set for a bit to firm up.
Serve and Enjoy!

Important Recipe Notes
- Use plain, lightly sweetened biscuits for the best texture. Crushing them finely helps the dough come together smoothly.
- Make the base slightly wider than the top so the pine cones stand upright without tipping over.
- In adding chocolate cereal, start at the bottom and work your way up in a spiral, angling each piece slightly to mimic real pine cone scales.
- Add the powdered sugar dusting last for a snowy effect, and only lightly so it doesn’t overwhelm the chocolate flavor.
- These can be prepared a day or two in advance and stored in an airtight container at room temperature.
Christmas Edible Chocolate Pine Cones

Ingredients
- 2 cups biscuits
- 2/3 cup cream cheese
- 1 cup chocolate cereal (plus more if needed)
- 1/3 cup shredded coconut
- 1/4 cup cocoa powder
- 2 tbsp powdered sugar (optional, for the paste)
- Powdered sugar for dusting
Instructions
- Begin by lining a baking tray with a Silpat mat. This handy mat will keep your pine cones from sticking and make cleanup a breeze. Set it aside for now.
- Grab your food processor and let’s get crushing! Blitz those biscuits until they’re nice and crumbly. This will be the base of our pine cone dough.
- In a medium bowl, combine the crushed biscuits with shredded coconut, cream cheese, cocoa powder, and powdered sugar (if you’re using it).
- Stir until everything is blended together into a smooth, thick dough.
- Divide your dough into 8 equal parts. Shape each piece into a cone, with the pointy end at the top. Place each cone on your prepared baking tray.
- Starting at the bottom of each cone, press chocolate cereal pieces into the dough, working your way up in a spiral pattern. Angle each piece slightly upwards to mimic the look of pine cone scales.
- Dust your chocolate pine cones with a light sprinkle of powdered sugar. This adds a snowy, wintery touch that’s perfect for the holidays.
- Let the pine cones set for a bit to firm up.
Check Out More Christmas Treat Ideas!
Melted Snowman Peanut Butter Cookies